
A Collection of Revit and Structural Engineering Information, Tips, and Solutions
Thursday, December 9, 2010
Autodesk University - Online Class List
Autodesk University - Online Class List 2010 for Revit Structure
Tuesday, November 30, 2010
Auburn Wins the Iron Bowl
28 - 27
 |
| "The Knockout" |
- Down 24-0 with 5 mins left in the 2nd Quarter
- Largest blown lead in Crimson Tide football history
- Snaps 20 game home winning streak
- Snaps 2 game winning streak
Auburn finishes the regular season 12-0 SEC WEST CHAMPS and NATIONAL CHAMPS
REVISIONS in REVIT
Seem like they work pretty well. Looks to definitely make things easier and more automated. BOOM FREE MONEY! This is pretty basic and was fairly easy to pick up. This is the method I will do rev clouds now. Pain in the Ass workaround free experience.
Here's what I've figured out so far.
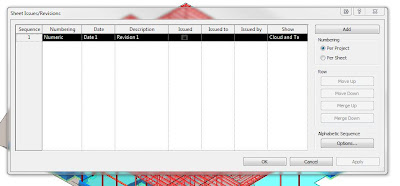
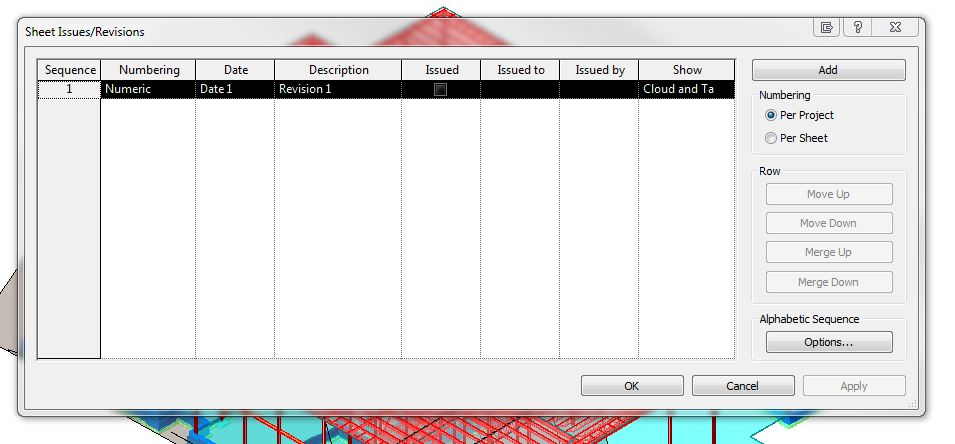
It's in a weird location. MANAGE tab, then ADDITIONAL SETTINGS panel, then (Sheet Issues/Revisions) on the toolbar. From there you add revisions, change information for each revision, and several options which I haven't used yet or maybe ever, but thier options none the less and the more the flexibility, the better. OK

And now it's time to add the revision cloud under the ANNOTATE ribbon, REVISION CLOUD, then in the properties box choose your revision # and draw you cloud.
Now ANNOTATE ribbon, TAG BY CATEGORY, pick the revision cloud, now you have the rev # symbol with the correct. There are some options of how the tag is displayed on the Properties bar below the Ribbon. Cool, moving on nicely.
 This should be all of the necessary information and steps to get the revision Information into the drawing. Now, we have to modify the title block file so that the revisions are shown correctly.
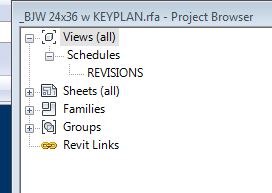
OPEN FILE--(family)--(titleblocks)--(whatever file you choose). In the title block file go to VIEW panel and you will see the REVISION SCHEDULE button. This appears to be a button exclusively for title block files, cool but buried kinda deep.
 Now we're in a psuedo-schedule-parameter box. Under FIELDS, add whatever columns you need I use Number and Date, but whatever you need here. From there you have the FORMATTTING, SORTING/GROUPING, & APPEARANCE tabs, which work just like any other schedule.

Then you drag and drop just like any other schedule. Seems to work well. Two Thumbs Up Autodesk. We'll leave on a high note....or a low note??
Here's what I've figured out so far.
It's in a weird location. MANAGE tab, then ADDITIONAL SETTINGS panel, then (Sheet Issues/Revisions) on the toolbar. From there you add revisions, change information for each revision, and several options which I haven't used yet or maybe ever, but thier options none the less and the more the flexibility, the better. OK

And now it's time to add the revision cloud under the ANNOTATE ribbon, REVISION CLOUD, then in the properties box choose your revision # and draw you cloud.
Now ANNOTATE ribbon, TAG BY CATEGORY, pick the revision cloud, now you have the rev # symbol with the correct. There are some options of how the tag is displayed on the Properties bar below the Ribbon. Cool, moving on nicely.
OPEN FILE--(family)--(titleblocks)--(whatever file you choose). In the title block file go to VIEW panel and you will see the REVISION SCHEDULE button. This appears to be a button exclusively for title block files, cool but buried kinda deep.


Then you drag and drop just like any other schedule. Seems to work well. Two Thumbs Up Autodesk. We'll leave on a high note....or a low note??
 | |||
| Schedule located manually in TB |
Tuesday, November 2, 2010
Online Wind Speed Reference ASCE 7-10
Scheduled to be launched in November by the ATC. Thank you!
ATC ASCE 7-10 Wind Speed
P.S. Not up yet as of Nov 2
Update: Still not up 1/6/11. Gonna check and see whats up
Update: BOOM it's there. Free Money folks. Really nice, although I think look up by zipcode would be a nice option, that is hardly grounds to complain. The ability to search the map is better anyway. Excellent Job! Thank you ATC
Monday, November 1, 2010
Changing the Project Elevation - The easy way
There have been several times I needed to change my elevations during the project to represent the "real" elevations such as (+) 100'-0" baseline instead of 0'-0". 100 works ok, but if you are using 569.32, instead of 0'-0" you're just asking for a headache. I know you gotta do it sometimes, but if that's the case use both numbers. Ok rant over. Two rants in two days. Guess you can tell what kind of week it's been and it's only Tuesday.
So here's the tip:
1) Open a (elevation view) any view is ok.
2) Go to (manage) ribbon and click the COORDINATES button

3) click the SPECIFY COORDINATES AT POINT button
4) pick your point you want to designate a certain elevation (or coordinate point)
5) Assign it a SHARED elevation (or coordinate point) and the model moves globally, which is important because you levels or anything in your model actually moves, just a reference number.
6) Then you will use the SPOT ELEVATION command to show the elevation of an element. This will be based off of elevation 0'-0"; i.e. your second floor would read (+) 13'-0"
7) Select the spot elevation you just entered and click EDIT TYPE (ET is a shortcut I will use) and duplicate the spot elevation tag. Name it Target (Shared) to fit in with the rest of the types.
8)Under the properties toward the bottom you will see ELEVATION ORIGIN you will have 3 options: shared, project, and relative (dont know what relative is yet). Choose shared and BOOM all your elevation tags using this type are now based off of your "real" elevations. Nice.

 Works cause my FF is def not 113' AFF!
So here's the tip:
1) Open a (elevation view) any view is ok.
2) Go to (manage) ribbon and click the COORDINATES button

3) click the SPECIFY COORDINATES AT POINT button
4) pick your point you want to designate a certain elevation (or coordinate point)
5) Assign it a SHARED elevation (or coordinate point) and the model moves globally, which is important because you levels or anything in your model actually moves, just a reference number.
 |
| 5) Specify a coordinate of elevation |
7) Select the spot elevation you just entered and click EDIT TYPE (ET is a shortcut I will use) and duplicate the spot elevation tag. Name it Target (Shared) to fit in with the rest of the types.
8)Under the properties toward the bottom you will see ELEVATION ORIGIN you will have 3 options: shared, project, and relative (dont know what relative is yet). Choose shared and BOOM all your elevation tags using this type are now based off of your "real" elevations. Nice.

Sunday, October 31, 2010
Footing Host
Im quite irratated at the moment. In my project, I have put in my foundation walls, my columns, my floor slabs and my wall foundations. I am needing to add a "pier" to my column to get the spread footing to the right elevation. Well, Revit, you are supposed to let me add the concrete column as a pier. First off, I hate the way columns are put in at the moment. Why can I not adjust the insertion elevations in the properties box when I put in a column. The whole depth, height, level thing is TERRIBLE TERRIBLE TERRIBLE. Well, after dealing with this issue and putting in the pier (Much more difficult than it should be) Now I cant get the columns to attach together and the footing to automatically move to the bottom of the pier. So I have to see what the slab elevation is and offset my footing from this elevation. THIS IS AWFUL. This one's for you Autodesk.

Update: Well, I don't really take any of it back, but you can use ALIGN to move the spread footings to the same elevations as the wall ftg which helps
Picking an End to Extend
So you want one end of your bar joist seats to extend to the deck edge. Visually, Revit doesn't provide you with any visual clues to determine which side is the end and which side is the start. There is a way to determine which end is which without trial and error. Im sure this is dumb and you've been there and done that and why am I talking about it. Well, maybe Im stupid, but either that changed something with Revit 11 or I've just gotten gotten it into my workflow.
When you select the member, to open the properties, hover over one of the end elevations, it will tell you whether it was the start or end. Still not perfect. (This one is pointed at you autocad, make the damn thing color coded or something. I mean shit, is it really that hard. I have seen where I can do this on my own, but really I pay you way to much money for that. Rant over) If you have put in a beam system or several joist simlarly it should work out pretty well and you can handle multiples at once.
So there it is. I'll add some pics later, but it's late and wanted to get something written down.
WAR CAM EAGLE! Currently Auburn ranked #1 in BCS and Cameron Newton is a FREAK. He is a really special player and no matter what happens in the win/loss column the rest of the year, if he stays healthy, he will be Auburn's 3rd Heisman Trophy winner.
When you select the member, to open the properties, hover over one of the end elevations, it will tell you whether it was the start or end. Still not perfect. (This one is pointed at you autocad, make the damn thing color coded or something. I mean shit, is it really that hard. I have seen where I can do this on my own, but really I pay you way to much money for that. Rant over) If you have put in a beam system or several joist simlarly it should work out pretty well and you can handle multiples at once.
So there it is. I'll add some pics later, but it's late and wanted to get something written down.
 |
| Cam Newton "Posterizing" an LSU defender on the Goal Line |
Wednesday, October 20, 2010
Quik Tip - Placing and Working with Views on Sheets
Gonna take this one straight from Mastering Revit Structure 2010. My bible for Revit. If you have Revit, you should have this book. Hats off guys! Gotta have one in 2012. Ok, here it is.
Within the (Project Browser), RIGHT CLICK the sheet onto which you will be placing a view, and select ADD VIEW. This action automatically opens to the selected sheet view and displays the Views dialog box shown in Figure 12.17. This dialog box shows a list of views that are not yet placed (the important part) onto any sheet. Choosing a view and clicking the ADD VIEW to sheet button allows you to place the selected view onto the sheet. By using this method you can avoid having to search thru the other views that are already placed on sheets.
There you go. A little explanation from me might help. I don't name my sections, we never did in autocad, but it didn't matter really due to the non linking nature of autocad. For Revit, it's probably a smart thing to do, at least a real quick name. "S Wall Porch Section" etc. That's taking it one step past this tip though. At least you can eliminate used sections without any work (Boom free money). It is difficult to discern section 32 from section 14, so at least this will eliminate some choices.
Todays Video:
This pretty much sums up my life the last month or so, in a good way though
Wednesday, October 6, 2010

Thursday, September 30, 2010

Cad on your Ipad/Iphone/Ipod
Modify and View your autocad files on your I-products. For all you hipsters out there. This is neat & I believe it's just another step of being able to access you files anywhere. Rock On Autocad
Autocad WS via CAD-a-Blog
This is an Autodesk licensed product btw download page

Autocad WS via CAD-a-Blog
This is an Autodesk licensed product btw download page

Monday, September 27, 2010
New Revit Extensions Coming Soon
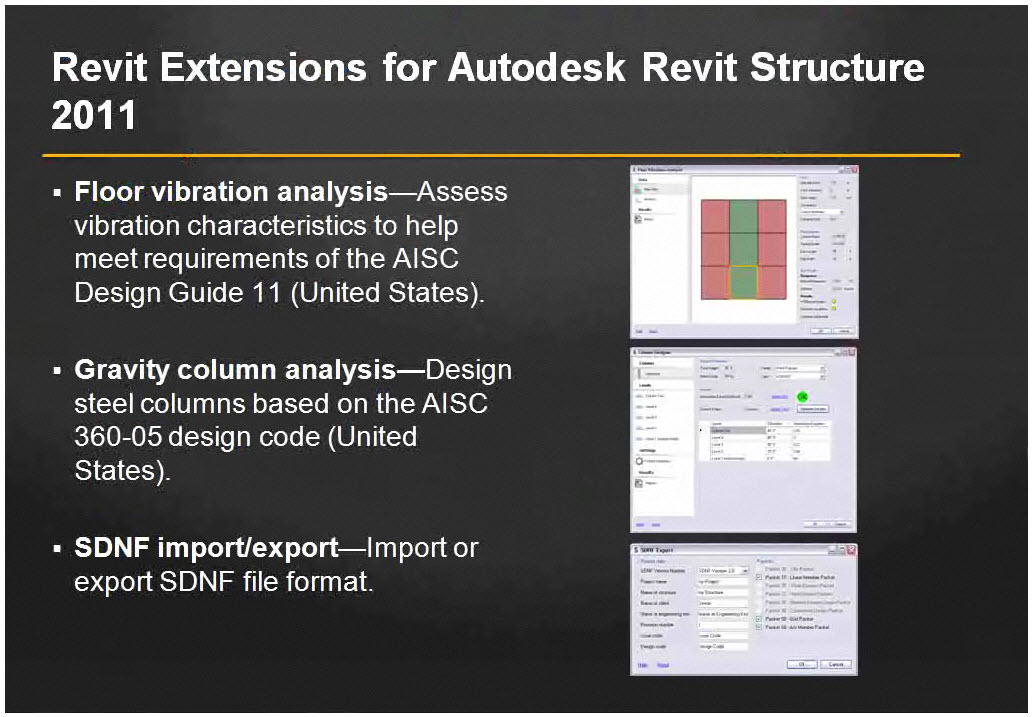
Graphic Showing Upcoming Extensions
Floor Vibration
Gravity Column Analysis
SDNF import/Export (Steel Detailing Nuetral Format)?
Also includes Revit Server - Allows people in multiple locations to work off a single Revit file. Big hole possibly filled here
Floor Vibration
Gravity Column Analysis
SDNF import/Export (Steel Detailing Nuetral Format)?
Also includes Revit Server - Allows people in multiple locations to work off a single Revit file. Big hole possibly filled here
Dropbox
Ok, everybody I work with hears my Dropbox stories, but I don't think they feel me on it. Im a geeky computer guy and want all my shit to work right and Im always looking for a shortcut to do anything. Is that good or bad, probably both, but it's my search for zen. Im a cheapass and this solution only cost me $10 a month for 50 GB, they will give you 250 MB free.
How does that tie into Revit? Im glad you asked. This is why I think Dropbox is excellent for people who work with large files (REVIT TIE-IN) over multiple computers and/or multiple locations. It also has some other key benefits as well.
I'll leave you on a happy note.......
How does that tie into Revit? Im glad you asked. This is why I think Dropbox is excellent for people who work with large files (REVIT TIE-IN) over multiple computers and/or multiple locations. It also has some other key benefits as well.
- 1 file. Simple as that. I open the same file, located locally on my computer (My Dropbox folder) across 4 computers at 2 locations. No overwriting, No Synchronization
- Like I said, it's located on your hard drive, therefore it's fast. You can't work in Revit off of a file thats located on an off site server, the time it takes to save would be huge.
- Any of you familiar with Getting Things Done methods will appreciate this. Basically I catch a lot of information everyday; So the easier I can digest that information in an orderly manner, the faster I am and better orgainized I am.
- For example. I save all info I get from emails at home or work or somewhere else (on my phone) to the same folder. It all goes in 1 organized place.
- Backup - Im lazy and don't backup my files enough. Well, Dropbox takes care of that. Your files are also stored online and can be accessed from anywhere.
- Phone Access - I can access my Dropbox from my Blackberry now. I can access any files or send anyone a link to anyfile in my dropbox.
- Today I sent a coworker a 20 MB Revit file with my phone, and there was 0 uploading or downloading to my phone, only opening or saving the file on his end.
- I use a plug in called airdropper. This allows you to send an email to someone which lets them directly upload a file up to 80 mb into your dropbox folder.
- Synchronization. There are lots of options and lots of limitations here, its a free-for-all and lots of trial and error to make it work.
I'll leave you on a happy note.......
Tuesday, August 24, 2010
KeyPlan. How do I..........
I'll show you, just give me a few days. err months. About to have to do it in a project, so its coming.
Monday, August 16, 2010
MOAL - Mother Of All Links - CADdigest Revit tip page
Dragging a little the last couple of weeks. Vacation hangover.
Anyway, been busy in Revit lately though. I've got some new stuff coming down the pipe. Capt Bob has a good door tip coming up soon.
For now check out the link:
CADdigest Revit Tutorials
It feels like Christmas time......Football is only 2 1/2 weeks away
Anyway, been busy in Revit lately though. I've got some new stuff coming down the pipe. Capt Bob has a good door tip coming up soon.
For now check out the link:
CADdigest Revit Tutorials
It feels like Christmas time......Football is only 2 1/2 weeks away
 |
| War Eagle! |
Wednesday, August 4, 2010
Vacation
Vacation was nice last week although I've learned, there is no such thing as vacation, you just do the work the week before and the week after. Thanks to my parents and aunts for keeping the kids.
 |
| Working Hard |
 |
| Hard to beat the beaches of Cancun |
Putting In A Sloped Roof
Courtesy of Capt Bob.
Basically Revit does a terrible job of handling sloped roofs once you have more than one slope or slopes in two directions. So we have developed a work around. You can use the roof command structure to develop a roof and attach the columns to the roof. It is questionable if even this is a good idea, but more on that later. Once you get that done turn the roof off and never look at it again. You might even want to delete it altogether.
Forget that there is any such animal as a roof. From now on you are working with a floor. It is just at the roof level. Do not put in a floor with multiple elevation points and planes. You are much better to divide the areas into individual sections for each area of your roof. i.e. if you have a building with a simple gable you have 2 roofs. If you have a hip then you have 4 roofs. You can see with some of our multi-slope roofs you will have a lot of different roofs.
At this point you can attach your columns to your floor, so as you can see if you had put in a roof it is now worthless. The main difference is you will have to deal with multiple sections rather than one section for attachment of the columns. It is your call; I think it is faster to not do the roof.
Now you have all your columns to the correct height then put beams or beams and joist using the 3d snapping check box. By doing that you can snap each of the beams or joist to the column. Now you might have to play with the column height offset at the top between the joist and the beams. On a recent job I attached the columns to the deck. Moved them down 2 ½” to put in the joist girders. Moved them back up 2 ½” to put in the tie joist. (Poor planning on my part) Then move them down 9” for the joist girder to sit on top of the column. Of course you can move all the columns globally and do the change for all of the columns at once.
Now you have your beams attached to the column in two directions. If you are lucky you can set your plane to the section of roof you are working in and then enter your joist as a beam system. If not you can just put them in one at a time using the 3d snapping.
Why would you not be lucky? Well there is an issue with a warped roof plane. Revit just won’t snap to it because it isn’t a plane surface. The moral to the story is: try not to use a warped plane. Theoretically what Revit does is correct. What we all know is the difference between the mathematician and the engineer is we just get it close and say it is good. You don’t know the joke keep reading. A mathematician and engineer were placed in a room and a beautiful unclothed woman was placed at the opposite end. They boys were told they could move toward the woman but could only go half way each move. The engineer took off and realized the mathematician hadn’t moved. He turn and ask “WTF Dude you aren’t moving” to which the mathematician replied “you will never get there if you can only go half way each time”. The engineer took off saying “I can get close enough”.
More later. By the way don’t use slabs either. They have similar issues. Repeat after me “Everything is a floor”. Good boy.
Friday, July 23, 2010
Linework
Hadn't used linework until now.
Basically, you can change the way the lines look on your screen/sheet. This applies to model and detail elements. Im not sure what all the rules are, but I have been looking for a solution to hiding some hidden grade beam lines for weeks and this was an easy fix. Can't say that often.
It also allows you to hide or change lines in section view. When the model elements just aren't quite the way you want them, you can change the linework and hide them but they are still available to keynote.
You really want to use regions as little as possible, but in this situation, it is SO much easier and faster just to draw the region and move on with little consequence to the integrity of the model.
Basically, you can change the way the lines look on your screen/sheet. This applies to model and detail elements. Im not sure what all the rules are, but I have been looking for a solution to hiding some hidden grade beam lines for weeks and this was an easy fix. Can't say that often.
 | ||||||
| This is the corner of a slab on grade with a grade beam, for some reason revit shows the hidden intersection line. That's dumb. So how do I get rid of it? |
 |
| You have to select an item on the screen before the linework tab appears. You can then change lines to a different linestyle. Here I will choose Invisible lines so that they will go away |
 |
| All better |
It also allows you to hide or change lines in section view. When the model elements just aren't quite the way you want them, you can change the linework and hide them but they are still available to keynote.
 |
| This is a PEMB footing attached to the slab. This is what the model elements look like without modification. We'd like to show the 45 degree chamfer of the footing edge to the slab. How do we do that? |
 |
| That looks better, I hid the elements and drew a concrete region. Oh wait, where did my spot elevation and slab keynote go? When you hide the elements all keynotes, elevations, etc. go away to. What now? |
 |
| Now, that's how we want it. You use the linework detail and change the lines to invisible. This keeps our dimensions, elevations and keynotes for our model elements. |
Thursday, July 22, 2010
Monday, July 19, 2010
Inserting or Linking CAD drawings into Revit.....a focus on viewing options
When you insert or link a CAD drawing into Revit, a key option is the checkbox INSERT INTO CURRENT VIEW ONLY. This will give you the option to move the reference in front of or behind your Revit elements. Very helpful. If you don't check the box, this option is unavailable.
 |
| The CURRENT VIEW ONLY checkbox is on the left. Another option is the COLORS, I like to choose (Preserve) from the pulldown instead of (Black and White) because it will look just like the file you are about to insert. |
 |
| When inserted into CURRENT VIEW ONLY several addtional options are available. The pulldown on the left allows you to bring the inserted/linked cad drawing in front of the revit model (foreground) or bring the revit model in front (background). This is similar to isolate layers/hide xref in autocad. On the right side you can SEND TO BACK or BRING TO FRONT. I really haven't used these options yet in this tab and haven't figured out when to use it. Maybe when multiple items are linked or inserted? |
 |
| FOREGROUND |
 |
| BACKGROUND |
Sunday, July 18, 2010
Getting Things Done: The Simple Dollar Part I
The Simple Dollar � Getting Things Done: A New Practice for a New Reality
This is a 14 part series on the book Getting Things Done by David Allen. I've found this is an effective way of applying organization to our crazy lives. The website it comes from: The Simple Dollar is a fantastic blog worth checking out everyday.
The Simple Dollar
This is a 14 part series on the book Getting Things Done by David Allen. I've found this is an effective way of applying organization to our crazy lives. The website it comes from: The Simple Dollar is a fantastic blog worth checking out everyday.
The Simple Dollar
Changing Grid Letters/Numbers and Section Numbers
You know, Revit will name/number the grids for you and wont let you have more one of each letter. This is all well and good, but what happens when you need to add a column line in between. From what I know as of right now, a total pain in the fucking ass happens. Well, sorta, and I guess I have come to expect so much automation from revit that this seems like it should have been handled.
If you have grids A-F and you want to add a grid between D & C, well you can't just name it D and start renaming from there because Revit will only allow one instance of each letter. Also, it will name the new grid G. Same thing for section numbers on detail sheets. If you add another section between section 3 & section 4 same deal.
The best way to handle this is start at the end and work your way back. First you have to name the new grid something crazy like X or something because you will change your F grid to G, then E to F, then D to E, then your new grid from X to D.
After cussing several times, it's just easier to start at the end and work back, but when you are adding several grids at different locations, it makes it even more cumbersome
I guess I just expect more from Revit. Is it so hard to ask me when I put in a grid if I want to rename all of the following grids? As the say on NFL primetime "C'MON MAN"!!!!!!!!!!!!
Somebody tell me Im a dumbass and there is a better way to do this or Autodesk fix this or tell me why you wont.
Funny, after writing this I found an extension by Avatec Utilities that takes care of this. Im not sure if it's part of their free download or not, but Im going to try it out.
Wednesday, July 14, 2010
Tuesday, July 13, 2010
Converting CAD details to Revit Details
Fear and Loathing In a CAD vs. BIM World: Converting CAD Details To Revit Details: Just Do It...One way or another.
This is a really good guide for changing a cad detail into a revit one. You just have to do it, and doing it as we go is the only way.
This is a really good guide for changing a cad detail into a revit one. You just have to do it, and doing it as we go is the only way.
MASKING REGION & FILLED REGION
We use these two commands a good bit, I think less and less as we get better and that is a good thing. Let me explain a little. If you draw it correctly in the model, you don't have to use these two commands to hatch the area, therefore completely elimating the step of actually typing the command and having to draw the area. Big plus from a time standpoint.
These commands essentially are self explanatory. Its not difficult to use the commands without any thought. However, there are a few tips and tricks in using them.
When selecting the fill pattern, designate model or drafing in the radio button. Of course drafting is 2D and model is 3D, but the drafting pattern gives you more material options.
That's about all I can think of right now. If there's anybody out there, let me know if you have anything to add or correct. Oh, I'll add some pretty pictures later, but for now it is what it is
These commands essentially are self explanatory. Its not difficult to use the commands without any thought. However, there are a few tips and tricks in using them.
- You use these most of the time to hide you model components in 2D detailing. This happens to me quite often as I can't make everything look correctly in 3D, it happens less and less but it still happens. For example, when you have a slab, turndown and footing, these are 3 seperate model elements and take some work to make look correct. So you have to hide them. This creates two time sucks.
- First, you have to draw your region and adjust the type to make it look correct
- Two, Keynotes do not show up when the elements are hidden, therefore your automatic noting goes away.
- There are a couple of items to be aware of when you are executing the command.
- After executing the FILLED REGION command, you will have access to the (Create Filled Region) Tab. On the right side, the line style controls the type of line for the outline of the region.
- To change the type of fill, in the (Properties Palette) you have to execute EDIT TYPE, then select whatever pattern from the TYPE pulldown. WTF autodesk??? Why isn't it in the (Properties Palette)
- After executing teh EDIT TYPE command in the (Properties Palette) you can create a new type of region by DUPLICATE and renaming. Fill pattern may be selected from the library, it can be opaque or transparent, the weight and color can be changed as well.
When selecting the fill pattern, designate model or drafing in the radio button. Of course drafting is 2D and model is 3D, but the drafting pattern gives you more material options.
That's about all I can think of right now. If there's anybody out there, let me know if you have anything to add or correct. Oh, I'll add some pretty pictures later, but for now it is what it is
Exporting to Autocad: The PCP file
revit in plain english: Revit PCP Files
Revit creates a pcp file whenever you export to CAD, this article explains a little how to manipulate it.
Revit creates a pcp file whenever you export to CAD, this article explains a little how to manipulate it.
Thursday, July 8, 2010
Wednesday, July 7, 2010
PROPOGATING EXTENTS
To transfer your column line modifications, such as length and spacing of the heads so they match, and turning symbols on and off to other views; you can use the Propagating Extents button.
There are some random problems with this tool. So if you run into problems with it not working like you think it should. Check out the Mastering Revit Book for some solutions.
There are some random problems with this tool. So if you run into problems with it not working like you think it should. Check out the Mastering Revit Book for some solutions.
Monday, July 5, 2010
Using Design Phases in Revit Drawings
Using Design Phase in Your Revit Project | CAD Notes
I haven't read this one yet, but have used phases on a Revit project and it didn't seem too difficult, although I just used the arch's existing elements and did not create my own
I haven't read this one yet, but have used phases on a Revit project and it didn't seem too difficult, although I just used the arch's existing elements and did not create my own
Saturday, July 3, 2010
Change Beam System Levels
 When you select a beam that's part of a beam system or if you select the beam system itself; the Reference Level and Work Plane option are grayed out.
To remedy this:


Friday, July 2, 2010
Revit Structure 2011 User Guide
Autodesk - Autodesk Revit Structure Services & Support - User's Guide
Here's a link to the user's guide. It's not hard to find, but it should be easier to access. So here you go.
Here's a link to the user's guide. It's not hard to find, but it should be easier to access. So here you go.
Thursday, July 1, 2010
The Best, the Rest, the Rare: 100 AutoCAD Tips You Should Know

The Best, the Rest, the Rare: 100 AutoCAD Tips You Should Know | CAD Notes
Not Revit, but some useful CAD tips
Revit Keyboard Shortcuts
 Modifying your keyboard shortcuts is really simple. I've found keyboard shortcuts are one of the best ways to improve your efficiency in revit.
 Under the view tab, at the end is the User Interface Button, click it and at the bottom of the pulldown is the keyboard shortcuts. Once you open that you can modify any command.
Monday, June 28, 2010
Slab Edges and Composite Floors
Revit ST: Slab Edges and Composite Floors
How to join a slab on grade w/ fill to a turndown. And most importantly make it look right.
How to join a slab on grade w/ fill to a turndown. And most importantly make it look right.
RSS Feeds within Communication Center
RSS Feeds within Communication Center

Useful for keeping up with your favorite Revit sites. Website tells ya how to do it.

Useful for keeping up with your favorite Revit sites. Website tells ya how to do it.
Saturday, June 26, 2010
Autodesk Revit Structure 2011 Web Update 1 is now available
REVIT Structure Learning Curve: Autodesk Revit Structure 2011 Web Update 1 is now available
Doesnt' seem very groundbreaking, but we'll see.
Doesnt' seem very groundbreaking, but we'll see.
Subscribe to:
Posts (Atom)