Getting Around

Why am I doing this?
To help unlock the potential of Revit Structure in less time, because time is money. Plain and Simple

Tuesday, July 26, 2011

Editing HollowCore Slabs in Revit Structure

I did a project last year with hollowcore and had a difficult time customizing the hollowcore slabs.  I got it to work, but it was too hard and it had its limitations, and ultimately was not a 100% correct model.

First, understand that hollowcore slabs are considered beams, not slab elements (rightfully so).  Cutting a shaft or other floor modifications will not work.  


  • In Revit Structure 2012, Either I missed it before or it's new, but there it is, plain as day @: HOME tab/OPENING panel/BY FACE button.  Right next to shaft opening.  


  • After (or before) you open the command, go to a plan view showing your hollow core slabs
  • Select the top face of the hollowcore slab


  • Create openings as you would in a floor boundary command.  You may modify the end of slabs as reqd or cut a hole in the middle of the slabs.


Finish and your done.  Unless Im missing something, the only drawback or feature that is lacking is being able to apply this across multiple panels.  As shown below, the opening must be done in two steps, then you still have to put holes in you topping slab if you have one. It's understandable that it is not included in revit, but as a beam system this would be a nice option.


Modifying each individual plank is time consuming.  Honestly, on a large project especially, Im not sure the effort is worth the reward.  You can create the edges fairly quickly with linework.

You can create the same quality drawings while retaining most all of the benefits of revit, with minimal linework.  I doubt the schedules are affected by the modifications.

The picture above shows two elements which meet what I consider to be 100% BIM.  

The beam bearing detail at the top features the wall notch with the bearing plate
The lower detail is the previously discussed hollowcore and topping notch out
 I believe the rebar and the steel detailing would fall outside this description.  What do you think?


Monday, July 25, 2011

Revit Structure 2012 to AutoCAD Structural Detailing

Revit Structure 2012 to AutoCAD Structural Detailing Tutorial | Autodesk Revit Structure

Thanks to Lawrence H.  @  Revit Structure Blog.  There is a bunch of good info and tutorials there.

This is a really good article and tutorial about interfacing Revit Structure with Autocad Structural detailing. As a structural firm I think bringing these capabilities on would be helpful, and in limited applications, allow for production of shop drawings. The big question is, can we sell it?


Wednesday, July 20, 2011

Save down Revit File

zeeveld: Save down Revit file?

Here's a lifeline if you save your file in a newer version of revit and need to go back

Wednesday, July 13, 2011

THE Scope Box & THE Matchline

My coworker John was having to manually move the end of each column to the Matchline to "filter" the column lines to only show up on the same plan as the columns.  Time Killer right there, especially because the column lines have to be done individually in this case.

Im guilty of not filtering the column lines due to the time it takes to do this.  This is a Easy, Simple, and Clean way of doing it.  BOOM Free Money.  Even better, the Scope Box has a 3D element to it, exactly like a Section Box in 3D views.  Therefore you can apply the column line filtering over as many levels as you choose.

Enter Scope Box. Yes Friends.  The Scope Box does have a purpose.  Took a 3 day introductory Revit course in 2009.  I remember scope boxes, but the instructor didn't say this explicitly solved the problem or I just didn't grasp it at that point.  Anyway, let's see how it works.


Go to the VIEW Tab, Hit the SCOPE BOX button, you have to draw a box here.  Make sure you cut the scope box extents short of the CROP REGION of the plan.  It doesn't have anything to do with the matchline.  Just make sure the boundaries of the scope box and the crop region do not cross or the column lines will show up.


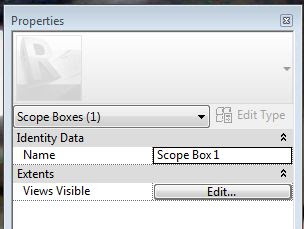
Now select the Scope Box, in the PROPERTIES box, you can give the scope box a name.  In our project, the side we drew our scope box on is Part "B".


Now we will repeat this for Part "A"


Lets go pick all the column lines which do not have a column in Part "B".  In the PROPERTIES Box, Assign them to Part "A" for the scope box.


Column line  A.1 Should not show up on my Part "B" Sheet or Plan.  You may have to adjust the crop region and the Scope Box sizes to get it to work correctly.  And we're out.

Killer.  No A.1 Column Line

Sunday, July 10, 2011

RISA & REVIT

STOKED to have picked up RISA capabilities at the office. Looks like we've swallowed the red pill.

Off we go, Im sure interoperability will become a mainstay (if there that exists yet) on the blog. Will it be a great duo or unmet expectations, time will tell....